Sinkcam at the ITP Winter show!
Drop by and say hi!

Posts Tagged ‘ processing ’
Drop by and say hi!

Sakura in Fukuoka
Hanami or flower viewing is commonly associated with the act of viewing cherry blossoms.
I think I’ve found my idea for my Computational Cameras final. It has an intresting history that dates back to the 18th century on how a single flower can symbolize extreme beauty and a quick death due to the fleeting nature of the cherry blossoms.

Cherry trees at Nagasaki ground zero
I’ll be implementing these in my final project by replacing it the lifespan of the cherry blossoms as you move through a given space.
So for the next few weeks I’ll be spending time at the Brooklyn Botanical Gardens to shoot pictures and video. I’m not sure yet if the petals will be falling but if not. I’ll attempt to recreate them in Processing.

While most everyone is using Junaio I decided to use the AR toolkit instead. I wanted to make something like magnetic letters on a refrigerator. I got the idea for this in church where each code represents a word.
One of the first things I encountered was the words were coming out in reverse. Even though I’ve already used the pushMatrix and popMatrix command in Processing 2.04a, the video now mirrored me, but the text was still in reverse. I attribute this to a bug but I’m not so sure. To solve this annoying problem, I projected the sketch to the wall and reverse projected it. Thus the letters finally came out the right way.
I just used a short phrase composing of 8 words, but the current library does not allow the same AR image to be repeated twice. Or I may need to fiddle with the code some more.
Putting the AR cards side by side gives me a phrase.

What could this secret messgae mean?

This may give me an idea for the final project if I plan to expand this.
import processing.video.*;
// Processing 2.04a + NyARToolkit 1.1.7
//pared down from Amnon Owed http://www.creativeapplications.net/processing/augmented-reality-with-processing-tutorial-processing/
import java.io.*; // for the loadPatternFilenames() function
import processing.opengl.*; // for OPENGL rendering
import jp.nyatla.nyar4psg.*; // the NyARToolkit Processing library
PFont myFont;
String the ="there";
String is ="is";
String no ="no";
String id ="I";
String there ="there";
String is2 ="is";
String only ="only";
String us ="us";
Capture cam;
MultiMarker nya;
void setup() {
size(640, 480, OPENGL);
myFont=loadFont("Helvetica-48.vlw");
cam = new Capture(this, 640, 480);
cam.start();
frameRate(15);
// create a new MultiMarker at a specific resolution (arWidth x arHeight), with the default camera calibration and coordinate system
nya = new MultiMarker(this, width, height, "camera_para.dat", NyAR4PsgConfig.CONFIG_DEFAULT);
// set the delay after which a lost marker is no longer displayed. by default set to something higher, but here manually set to immediate.
//nya.setLostDelay(1);
nya.addARMarker("4x4_1.patt", 80); //your have to print out the cooresponding pdf file and put the .patt files in data folder
nya.addARMarker("4x4_2.patt", 80);
nya.addARMarker("4x4_3.patt", 80);
nya.addARMarker("4x4_4.patt", 80);
nya.addARMarker("4x4_5.patt", 80);
nya.addARMarker("4x4_6.patt", 80);
nya.addARMarker("4x4_7.patt", 80);
nya.addARMarker("4x4_8.patt", 80);
}
void draw() {
background(255); // a background call is needed for correct display of the marker results
cam.read();
//image(cam, 0, 0, width, height); // display the image at the width and height of the sketch window
// flip image horizonatlly
pushMatrix();
scale(-1, 1);
translate(-cam.width, 0);
// image(cam, 0, 0, width, height);
popMatrix();
// pushMatrix();
// scale(-1,0);
nya.detect(cam); // detect markers in the input image at the correct resolution (incorrect resolution will give assertion error)
if (nya.isExistMarker(0)) {
setMatrix(nya.getMarkerMatrix(0)); //use this marker to translate and rotate the processing drawing
translate(0, 0); //offset half the size of the cube.
fill(0);
textFont(myFont, 24);
text(the, 0, 0);
}
perspective();
if (nya.isExistMarker(1)) {
setMatrix(nya.getMarkerMatrix(1));
translate(0, 0);
fill(0);
textFont(myFont, 24);
text(is, 0, 0);
}
perspective();
if (nya.isExistMarker(2)) {
setMatrix(nya.getMarkerMatrix(2));
translate(0, 0);
fill(0);
textFont(myFont, 24);
text(no, 0, 0);
}
perspective();
if (nya.isExistMarker(3)) {
setMatrix(nya.getMarkerMatrix(3));
translate(0, 0);
fill(0);
textFont(myFont, 24);
text(id, 0, 0);
}
perspective();
if (nya.isExistMarker(4)) {
setMatrix(nya.getMarkerMatrix(4));
translate(0, 0);
fill(0);
textFont(myFont, 24);
text(there, 0, 0);
}
perspective();
if (nya.isExistMarker(5)) {
setMatrix(nya.getMarkerMatrix(5));
translate(0, 0);
fill(0);
textFont(myFont, 24);
text(is2, 0, 0);
}
perspective();
if (nya.isExistMarker(6)) {
setMatrix(nya.getMarkerMatrix(6));
translate(0, 0);
fill(0);
textFont(myFont, 24);
text(only, 0, 0);
}
perspective();
if (nya.isExistMarker(7)) {
setMatrix(nya.getMarkerMatrix(7));
translate(0, 0);
fill(0);
textFont(myFont, 24);
text(us, 0, 0);
}
// popMatrix();
}
I’ve posted it before I think that I always wanted a holodeck. But of course this is nothing like that. So for this project I finally got the network camera working at my place in Queens and uploading the images every 15 minutes. I shot some video from a window at ITP and put the two together.
I knew I was going to use the Kinect and initially began using the depthMap and measuring in inches and using the values there to determine distance. That didn’t work for me. I decided to use the Center of Mass or CoM command to determine the position but then depth would be another problem.
Soooo for the purposes of this project I just adjusted the position of the kinect to be overhead to simplify the position.
Adding a fornt facing camera turned out to be more challenging. For some reason, OpenNI takes over all the cameras of the computer and will only want the kinect. Solution? Add another kinect.
I’d like to expand this further with head tracking such as imitating the look around an area or even creating the illusion of depth without 3D glasses.
import oscP5.*;
OscP5 oscP5;
//crane[] crane;
PImage crane1;
PImage crane2;
PImage crane3;
PImage crane4;
PImage crane5;
PImage apple;
String crane= "crane1, crane2, crane3, crane4, crane5";
PVector posePosition;
boolean found;
float eyeLeftHeight;
float eyeRightHeight;
float mouthHeight;
float mouthWidth;
float nostrilHeight;
float leftEyebrowHeight;
float rightEyebrowHeight;
float[] chew = new float [5];
//float[] crane = new float [crane1, crane2, crane3, crane4, crane5];
//float chew = 0;
PVector[] meshPoints;
float poseScale;
void setup() {
size(640, 480);
frameRate(30);
for (int i =0; i < chew.length; i++) {
chew[i] += 1;
}
// crane = new crane [crane1, crane2, crane3, crane4, crane5];
crane1 = loadImage("crane01.JPG");
crane2 = loadImage("crane02.JPG");
crane3 = loadImage("crane03.JPG");
crane4 = loadImage("crane04.JPG");
crane5 = loadImage("crane05.JPG");
apple = loadImage("apple.jpg");
meshPoints = new PVector[66];
for (int i = 0; i < meshPoints.length; i++) {
meshPoints[i] = new PVector();
}
oscP5 = new OscP5(this, 8338);
oscP5.plug(this, "mouthWidthReceived", "/gesture/mouth/width");
oscP5.plug(this, "mouthHeightReceived", "/gesture/mouth/height");
oscP5.plug(this, "eyebrowLeftReceived", "/gesture/eyebrow/left");
oscP5.plug(this, "eyebrowRightReceived", "/gesture/eyebrow/right");
oscP5.plug(this, "eyeLeftReceived", "/gesture/eye/left");
oscP5.plug(this, "eyeRightReceived", "/gesture/eye/right");
oscP5.plug(this, "jawReceived", "/gesture/jaw");
oscP5.plug(this, "nostrilsReceived", "/gesture/nostrils");
oscP5.plug(this, "found", "/found");
oscP5.plug(this, "poseOrientation", "/pose/orientation");
oscP5.plug(this, "posePosition", "/pose/position");
oscP5.plug(this, "poseScale", "/pose/scale");
oscP5.plug(this, "loadMesh", "/raw");
}
void draw() {
background(0);
stroke(100);
/*
for (int i=0; i 1) {
image(apple, 0, 0, 640, 480);
}
//}
/* if (found) {
fill(255);
for (int i = 0; i 0) {
PVector prev = meshPoints[i-1];
line(prev.x, prev.y, p.x, p.y);
}
}*/
/translate(posePosition.x, posePosition.y);
scale(poseScale);
noFill();
// ellipse(0,0, 3,3);
ellipse(-20, eyeLeftHeight * -9, 20, 7);
ellipse(20, eyeRightHeight * -9, 20, 7);
ellipse(0, 20, mouthWidth 3, mouthHeight * 3);
ellipse(-5, nostrilHeight * -1, 7, 3);
ellipse(5, nostrilHeight * -1, 7, 3);
rectMode(CENTER);
fill(0);
rect(-20, leftEyebrowHeight * -5, 25, 5);
rect(20, rightEyebrowHeight * -5, 25, 5);
*/
}
//}
public void mouthWidthReceived(float w) {
// println("mouth Width: " + w);
mouthWidth = w;
}
public void mouthHeightReceived(float h) {
println("mouth height: " + h);
mouthHeight = h;
}
public void eyebrowLeftReceived(float h) {
// println("eyebrow left: " + h);
leftEyebrowHeight = h;
}
public void eyebrowRightReceived(float h) {
// println("eyebrow right: " + h);
rightEyebrowHeight = h;
}
public void eyeLeftReceived(float h) {
// println("eye left: " + h);
eyeLeftHeight = h;
}
public void eyeRightReceived(float h) {
// println("eye right: " + h);
eyeRightHeight = h;
}
public void jawReceived(float h) {
// println("jaw: " + h);
}
public void nostrilsReceived(float h) {
// println("nostrils: " + h);
nostrilHeight = h;
}
public void found(int i) {
println("found: " + i); // 1 == found, 0 == not found
found = i == 1;
}
public void posePosition(float x, float y) {
//println("pose position\tX: " + x + " Y: " + y );
posePosition = new PVector(x, y);
}
public void poseScale(float s) {
//println("scale: " + s);
poseScale = s;
}
public void poseOrientation(float x, float y, float z) {
//println("pose orientation\tX: " + x + " Y: " + y + " Z: " + z);
}
public void loadMesh(float x0, float y0, float x1, float y1, float x2, float y2, float x3, float y3, float x4, float y4, float x5, float y5, float x6, float y6, float x7, float y7, float x8, float y8, float x9, float y9, float x10, float y10, float x11, float y11, float x12, float y12, float x13, float y13, float x14, float y14, float x15, float y15, float x16, float y16, float x17, float y17, float x18, float y18, float x19, float y19, float x20, float y20, float x21, float y21, float x22, float y22, float x23, float y23, float x24, float y24, float x25, float y25, float x26, float y26, float x27, float y27, float x28, float y28, float x29, float y29, float x30, float y30, float x31, float y31, float x32, float y32, float x33, float y33, float x34, float y34, float x35, float y35, float x36, float y36, float x37, float y37, float x38, float y38, float x39, float y39, float x40, float y40, float x41, float y41, float x42, float y42, float x43, float y43, float x44, float y44, float x45, float y45, float x46, float y46, float x47, float y47, float x48, float y48, float x49, float y49, float x50, float y50, float x51, float y51, float x52, float y52, float x53, float y53, float x54, float y54, float x55, float y55, float x56, float y56, float x57, float y57, float x58, float y58, float x59, float y59, float x60, float y60, float x61, float y61, float x62, float y62, float x63, float y63, float x64, float y64, float x65, float y65) {
println("loading mesh...");
meshPoints[0].x = x0;
meshPoints[0].y = y0;
meshPoints[1].x = x1;
meshPoints[1].y = y1;
meshPoints[2].x = x2;
meshPoints[2].y = y2;
meshPoints[3].x = x3;
meshPoints[3].y = y3;
meshPoints[4].x = x4;
meshPoints[4].y = y4;
meshPoints[5].x = x5;
meshPoints[5].y = y5;
meshPoints[6].x = x6;
meshPoints[6].y = y6;
meshPoints[7].x = x7;
meshPoints[7].y = y7;
meshPoints[8].x = x8;
meshPoints[8].y = y8;
meshPoints[9].x = x9;
meshPoints[9].y = y9;
meshPoints[10].x = x10;
meshPoints[10].y = y10;
meshPoints[11].x = x11;
meshPoints[11].y = y11;
meshPoints[12].x = x12;
meshPoints[12].y = y12;
meshPoints[13].x = x13;
meshPoints[13].y = y13;
meshPoints[14].x = x14;
meshPoints[14].y = y14;
meshPoints[15].x = x15;
meshPoints[15].y = y15;
meshPoints[16].x = x16;
meshPoints[16].y = y16;
meshPoints[17].x = x17;
meshPoints[17].y = y17;
meshPoints[18].x = x18;
meshPoints[18].y = y18;
meshPoints[19].x = x19;
meshPoints[19].y = y19;
meshPoints[20].x = x20;
meshPoints[20].y = y20;
meshPoints[21].x = x21;
meshPoints[21].y = y21;
meshPoints[22].x = x22;
meshPoints[22].y = y22;
meshPoints[23].x = x23;
meshPoints[23].y = y23;
meshPoints[24].x = x24;
meshPoints[24].y = y24;
meshPoints[25].x = x25;
meshPoints[25].y = y25;
meshPoints[26].x = x26;
meshPoints[26].y = y26;
meshPoints[27].x = x27;
meshPoints[27].y = y27;
meshPoints[28].x = x28;
meshPoints[28].y = y28;
meshPoints[29].x = x29;
meshPoints[29].y = y29;
meshPoints[30].x = x30;
meshPoints[30].y = y30;
meshPoints[31].x = x31;
meshPoints[31].y = y31;
meshPoints[32].x = x32;
meshPoints[32].y = y32;
meshPoints[33].x = x33;
meshPoints[33].y = y33;
meshPoints[34].x = x34;
meshPoints[34].y = y34;
meshPoints[35].x = x35;
meshPoints[35].y = y35;
meshPoints[36].x = x36;
meshPoints[36].y = y36;
meshPoints[37].x = x37;
meshPoints[37].y = y37;
meshPoints[38].x = x38;
meshPoints[38].y = y38;
meshPoints[39].x = x39;
meshPoints[39].y = y39;
meshPoints[40].x = x40;
meshPoints[40].y = y40;
meshPoints[41].x = x41;
meshPoints[41].y = y41;
meshPoints[42].x = x42;
meshPoints[42].y = y42;
meshPoints[43].x = x43;
meshPoints[43].y = y43;
meshPoints[44].x = x44;
meshPoints[44].y = y44;
meshPoints[45].x = x45;
meshPoints[45].y = y45;
meshPoints[46].x = x46;
meshPoints[46].y = y46;
meshPoints[47].x = x47;
meshPoints[47].y = y47;
meshPoints[48].x = x48;
meshPoints[48].y = y48;
meshPoints[49].x = x49;
meshPoints[49].y = y49;
meshPoints[50].x = x50;
meshPoints[50].y = y50;
meshPoints[51].x = x51;
meshPoints[51].y = y51;
meshPoints[52].x = x52;
meshPoints[52].y = y52;
meshPoints[53].x = x53;
meshPoints[53].y = y53;
meshPoints[54].x = x54;
meshPoints[54].y = y54;
meshPoints[55].x = x55;
meshPoints[55].y = y55;
meshPoints[56].x = x56;
meshPoints[56].y = y56;
meshPoints[57].x = x57;
meshPoints[57].y = y57;
meshPoints[58].x = x58;
meshPoints[58].y = y58;
meshPoints[59].x = x59;
meshPoints[59].y = y59;
meshPoints[60].x = x60;
meshPoints[60].y = y60;
meshPoints[61].x = x61;
meshPoints[61].y = y61;
meshPoints[62].x = x62;
meshPoints[62].y = y62;
meshPoints[63].x = x63;
meshPoints[63].y = y63;
meshPoints[64].x = x64;
meshPoints[64].y = y64;
meshPoints[65].x = x65;
meshPoints[65].y = y65;
}
void oscEvent(OscMessage theOscMessage) {
if (theOscMessage.isPlugged()==false) {
println("UNPLUGGED: " + theOscMessage);
}
}
This week Kim Ash and I worked together on the skeletal tracking of the Kinect using OpenNI. The idea is when you reach a pose, a “nuclear” explosion occurs. Using the code sample from ITP Resident Greg Borenstien’s book “Making Things See, 2011”, it was fairly straightforward enough to get the skeletal tracking in place.
We wanted the explosion to occur once the two outstretched arms were in place.

In this image, we just wanted to track the arms. This is possible using the OpenNI commands:
  kinect.getJointPositionSkeleton(userId, SimpleOpenNI.SKEL_RIGHT_HAND, rightHand);
  kinect.getJointPositionSkeleton(userId, SimpleOpenNI.SKEL_RIGHT_ELBOW, rightElbow);
  kinect.getJointPositionSkeleton(userId, SimpleOpenNI.SKEL_RIGHT_SHOULDER, rightShoulder);
  kinect.getJointPositionSkeleton(userId, SimpleOpenNI.SKEL_LEFT_SHOULDER, leftShoulder);
  kinect.getJointPositionSkeleton(userId, SimpleOpenNI.SKEL_LEFT_ELBOW, leftElbow);
  kinect.getJointPositionSkeleton(userId, SimpleOpenNI.SKEL_LEFT_HAND, leftHand);
Then by using an “if” statement, it was just measuring the position of the joints that would give the outstretched arms pose.
if (rightElbow.y > rightShoulder.y && rightElbow.x > rightShoulder.x && leftElbow.y > leftShoulder.y && leftElbow.x > leftShoulder.x) {
stroke(255);
}
else {
tint(255, 255);
image(cloud, 840, 130, 206, 283);
explosion.play();
// stroke(255, 0, 0);
}
kinect.drawLimb(userId, SimpleOpenNI.SKELRIGHTSHOULDER, SimpleOpenNI.SKELRIGHTELBOW);
kinect.drawLimb(userId, SimpleOpenNI.SKELLEFTSHOULDER, SimpleOpenNI.SKELLEFTELBOW);
  // right hand above right elbow
  // AND
  // right hand right of right elbow
  if (rightHand.y > rightElbow.y && rightHand.x > rightElbow.x && leftHand.y > leftElbow.y && leftHand.x > leftElbow.x) {
    stroke(255);
  }
  else {
     tint(255, 255);
     image(cloud, 840, 130, 206, 283);
     explosion.play();
 //   stroke(255, 0, 0);
  }
  kinect.drawLimb(userId, SimpleOpenNI.SKEL_RIGHT_HAND, SimpleOpenNI.SKEL_RIGHT_ELBOW);
  kinect.drawLimb(userId, SimpleOpenNI.SKEL_LEFT_HAND, SimpleOpenNI.SKEL_LEFT_ELBOW);
}
Which results in this:
We wanted a better screen capture but for some reason this sketch didn’t like Ambrosia’s SnapzPro.
Full code:
import ddf.minim.;
import ddf.minim.signals.;
import ddf.minim.analysis.;
import ddf.minim.effects.;
Minim minim;
AudioPlayer explosion;
import SimpleOpenNI.*;
SimpleOpenNI kinect;
PImage back;
PImage cloud;
void setup() {
size(640*2, 480);
back = loadImage(“desert.png”);
cloud = loadImage(“cloud.png”);
// imageMode(CENTER);
minim = new Minim(this);
explosion = minim.loadFile(“explosion.mp3”);
kinect = new SimpleOpenNI(this);
kinect.enableDepth();
kinect.enableRGB();
kinect.enableUser(SimpleOpenNI.SKELPROFILEALL);
strokeWeight(5);
}
void draw() {
background(0);
kinect.update();
image(kinect.depthImage(), 0, 0);
// image(kinect.rgbImage(),640,0);
image(back, 640, 0, 640, 480);
IntVector userList = new IntVector();
kinect.getUsers(userList);
if (userList.size() > 0) {
int userId = userList.get(0);
if ( kinect.isTrackingSkeleton(userId)) {
PVector rightHand = new PVector();
PVector rightElbow = new PVector();
PVector rightShoulder = new PVector();
PVector leftHand = new PVector();
PVector leftElbow = new PVector();
PVector leftShoulder = new PVector();
  kinect.getJointPositionSkeleton(userId, SimpleOpenNI.SKEL_RIGHT_HAND, rightHand);
  kinect.getJointPositionSkeleton(userId, SimpleOpenNI.SKEL_RIGHT_ELBOW, rightElbow);
  kinect.getJointPositionSkeleton(userId, SimpleOpenNI.SKEL_RIGHT_SHOULDER, rightShoulder);
  kinect.getJointPositionSkeleton(userId, SimpleOpenNI.SKEL_LEFT_SHOULDER, leftShoulder);
  kinect.getJointPositionSkeleton(userId, SimpleOpenNI.SKEL_LEFT_ELBOW, leftElbow);
  kinect.getJointPositionSkeleton(userId, SimpleOpenNI.SKEL_LEFT_HAND, leftHand);

  // right elbow above right shoulder
  // AND
  // right elbow right of right shoulder
  if (rightElbow.y > rightShoulder.y && rightElbow.x > rightShoulder.x && leftElbow.y > leftShoulder.y && leftElbow.x > leftShoulder.x) {
    stroke(255);
  }
  else {
     tint(255, 255);
     image(cloud, 840, 130, 206, 283);
     explosion.play();
   // stroke(255, 0, 0);
  }
  kinect.drawLimb(userId, SimpleOpenNI.SKEL_RIGHT_SHOULDER, SimpleOpenNI.SKEL_RIGHT_ELBOW);
  kinect.drawLimb(userId, SimpleOpenNI.SKEL_LEFT_SHOULDER, SimpleOpenNI.SKEL_LEFT_ELBOW);

  // right hand above right elbow
  // AND
  // right hand right of right elbow
  if (rightHand.y > rightElbow.y && rightHand.x > rightElbow.x && leftHand.y > leftElbow.y && leftHand.x > leftElbow.x) {
    stroke(255);
  }
  else {
     tint(255, 255);
     image(cloud, 840, 130, 206, 283);
     explosion.play();
 //   stroke(255, 0, 0);
  }
  kinect.drawLimb(userId, SimpleOpenNI.SKEL_RIGHT_HAND, SimpleOpenNI.SKEL_RIGHT_ELBOW);
  kinect.drawLimb(userId, SimpleOpenNI.SKEL_LEFT_HAND, SimpleOpenNI.SKEL_LEFT_ELBOW);
}
}
}
// user-tracking callbacks!
void onNewUser(int userId) {
println(“start pose detection”);
kinect.startPoseDetection(“Psi”, userId);
}
void onEndCalibration(int userId, boolean successful) {
if (successful) {
println(” User calibrated !!!”);
kinect.startTrackingSkeleton(userId);
}
else {
println(” Failed to calibrate user !!!”);
kinect.startPoseDetection(“Psi”, userId);
}
}
void onStartPose(String pose, int userId) {
println(“Started pose for user”);
kinect.stopPoseDetection(userId);
kinect.requestCalibrationSkeleton(userId, true);
}
void keyPressed() {
switch(key)
{
case ‘ ‘:
kinect.setMirror(!kinect.mirror());
break;
}
}
void close () {
explosion.close();
minim.stop();
super.stop();
}
A far cry from what I made for the midterms, I think this would be better on another surface other than my computer screen.

So I’ve been able to parse the weather API of Yahoo and the AP headline feeds for news. Using two XML parsing codes is a bit challenging. There’s something in the flickr API that isn’t jist working for me so each image is manually assigned to each weather condition set by Yahoo.

This was the original weather midterm project with no data and just computer drawn images.

This is the raw AP headline feed experiment that I merged with my earlier code.
I think that this information lives outside of our mobile phones and screen but instead it should be around us. I had a last minute inspiration on the subway ride home that I wish this was projected on the window of the train so I know what’s going on above ground.
I wanted to project this on a surface with a kinect camera looking at it at the same time where it would give the false impression of gesture control. But doing certain gestures on the projected surface, it would either refresh the news data or change the weather location.
I think I’ll work on this some more during the break. Code to be posted soon.
I’ve decided to expand my midterm project for ICM by using real data this time.
Thanks to NYU Professor Dan Shiffman’s Yahoo Weather API code I had somewhere to begin with. Going through the Yahoo API wasn’t that hard and neither was parsing the data from the XML feed. I did however wanted to find locations outside the US since the original code is based on using ZIP for location. A newer version of the Yahoo Weather API uses their own WOEID which includes places outside the US but the syntax is not as easy as just entering the zip code.
I didn’t want to figure out how to map the entire WOEID database for this project so I selected a few cities for me.

I wanted to work with the flickr API as well into integrating photos appropriate to the weather condition but it wasn’t being cooperative. I ended up tagging the weather pattern data to images manually. None of the images are locally stored. This causes a bit of a slowdown but makes the file smaller.

Figures are in Farenheit.

Stuff I still like to add, conform the images to the location and weather pattern. Add a clothing suggestion. Ability to change location without having to enter the code manually for every city you want to check. Add video for some reason or another.
Inspired by “Picasso’s Drawing with Light” we wanted to make something similar but instead of taking pictures, we would be using live video.
http://www.life.com/embed/index/gallery/id/24871/size/large/isHd/0
While Picasso used a slow shutter speed and a quick hand with a flashlight to create the images. We used arduino and processing to create our own “graffiti can”.
Initially we wanted to only use an accelerometer to track the movement on the screen but that proved to be very challenging since there was a a lot of computational math involved in converting the acceleration of the sensor to actual X and Y points on the screen.
After consulting ITP Resident Greg Borenstein he suggested that we should just track a light pointed at the camera in processing to create the images instead of the accelerometer. This was a last minute code change which changed our approach completely. But using examples in processing, it shortened the time to buld the code.

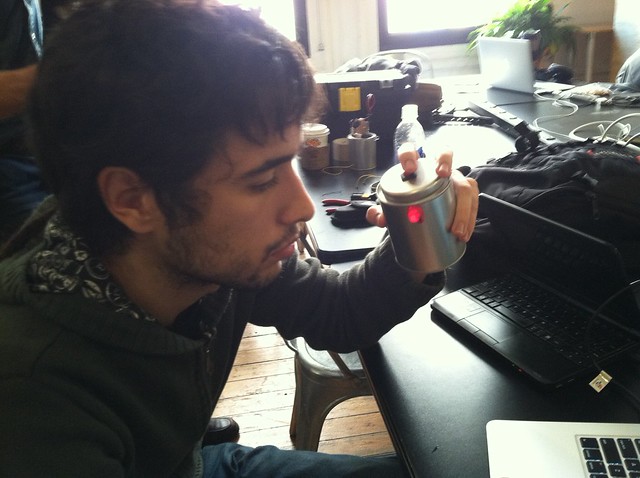
Here we are building the code and can at the same time.

Adria testing the serial connection.

Serial input coming in.

Wiring for the red can.

We opted for a smaller breadboard to make things lighter and compact inside.

This might have worked better in another manner, but I mounted the arduino uno and the breadboard back to back on a strip of corrugated cardboard to make things easier to dismantle and attack by just screwing them.

One slight problem, the 9V power connector was sticking out.

But eventually everything fit but cramming it all in.

We used alligator clips to be able to quickly attach and detach the board from the super bright LED if we had to make any changes.
Getting the bluetooth to work was very tricky, because in order for the bluetooth to work, the BT chip must be disconnected while uploading the code for the arduino and attaching it afterwards. The BT will not pair with the computer unless the sketch was running. It took a bit of wrangling but it eventually worked.
We became ambitious and worked on a second can.

We also started using an external USB camera to make the video resolution a bit better. But, like the BT it was a challenge to get these two to work as well.
Adria here with last minute changes to can.

Crunch time! Need to fit everything inside working!

Red vs Blue
Thank you Veronika and Lisa for the documentation photos and videos!
Graffiti Can Members
Adria Navarro-Lopez
Veronika Dubrovskaya
Melissa dela Merced
Joseph McCagherty
For my ICM midterms, I thought of things to make that would look cool but at the same time, represent me or at least the artistic side of me if there ever is one. I decided to make a season clock.
I come from a country where the only sesons we have is hot and rain. Not much to choose from there so it always facinated me when I travelled when we encountered different seasons. It was only when I was working when I encountered fall and winter which always seemed the most interesting in photographs.
Last year, my father and I went to Yosemite National Park, it was my first trip to the park and of course we brought along a 4×5 camera much like Ansel Adams did.
We went there almost one year exactly to date and I took inspiration from these pictures that I shot while I was there.

and this

The whole park was practically yellow and yellow leaves were falling all around us the entire time. It was beautiful. I decided to make seasonal clock after this.
Depending on the month on your computer, the season changes. For the fall, I made an approximation of yellow leaves falling. Winter is represented by snow and spring is shown in the form of cherry blossoms taken in reference from this photo.

Taken at ground zero in Nagasaki.
There is a lot of potential to add to the sketch by adding Christimas lights between Thanksgiving and January, Halloween decorations for October and so on. You can see the seasons change by changing the internal clock of your computer. Note: seasons are based on the Northern Hemesphere.
Future versions planned:


| M | T | W | T | F | S | S |
|---|---|---|---|---|---|---|
| 1 | 2 | 3 | 4 | 5 | 6 | 7 |
| 8 | 9 | 10 | 11 | 12 | 13 | 14 |
| 15 | 16 | 17 | 18 | 19 | 20 | 21 |
| 22 | 23 | 24 | 25 | 26 | 27 | 28 |
| 29 | 30 | |||||


